Homebrew Rigblaster Nomic Data Cable

Since I got the SignaLink I figured I can mess around with the Rigblaster.  I wanted to adapt it to the FT-100 so If I ever go out with it and a laptop, I can do some digital work using the rigblaster as a interface.

On their website they posted a article “Connecting your FT-897 to The Rigblaster NOMIC for digital operation” (Written By Jeff, K8YSV).

I Followed the directions to the T and here it is!

Just some things I would like to point out. The FT-817, FT-857D, FT-897, FT-100D, FT-950,  FT-2000 and I am sure many other makes and models use the MINI 6 PIN DIN connector which is the same as a PS2 cable that you find on a semi older keyboards and mouses (mice). I thought it would be easy and just find a old mouse or keyboard, clip the wire and use the connector. Well guess what? The PS2 Mouse and keyboard use 4 out of the 6 pins and the two that have nothing connected to them are need to wire up for the Yaesu rigs. You just might be lucky and come across a cable that works. I went through about a dozen keyboards and mouses until I gave up. Getting frustrated I went on Ebay and picked up a 6 pack of connectors for $10 w/ shipping.

If you follow the entire article on the above link you can make a cable with just basic soldering skills.  I added a ferrite choke to the data and audio cables to help cut down on the noise generated from nearby objects.

After constructing the cable and testing it out, I wasn’t too impressed on it’s performance compared to hooking the NOMIC up using the Microphone jack and audio patch cables.

I notice it didn’t sound right. I don’t have the proper analyzing equipment to give a detailed reason why but if you look at the band edges on the above picture, you will notice a drop off which I never seen with the unit normally hooked up. I also notice that the audio is not as strong either. I had to max out all the settings on my soundcard and radio. Even with the levels maxed and removing the resistor on the NOMIC board,  the audio still seemed low.

Overall I am not too thrilled about the outcome of the cable but it works. It makes it possible to use the microphone again and It’s going to help on a future project I have in the works.

3/31 Contacts

Since my recent purchase I’ve been back into digital. In the past couple of say 20M in the afternoon has been really good to me

N1BMX Spots On PSK Reporter

I made contact with the following

RK9AN – Anvar -Asiatic Russia
RN3AJK – Artem – Euro Russia
DK9WB – Jakob – Germany
CT2FPY – Leonel – Portugal
M0NPQ – Nerijus – England
DL5MGH – Armin – Germany
IW3SGT – Alessandro – Italy
IZ3LEF – Emiliano – Italy
IW6NBX – Antonio – Italy
SP5GRU – Wlodek – Poland
EA3BJW – Joan – Spain
US5CCO – Vlad – Ukraine
UA3ON – Antoly – Euro Russia
RD3WW – Vladimir – Euro Russia
IN3NHZ – Roberto – Italy
KE5AQD – Roger – USA
W3CRR – Craig – USA
9A4A – Zlatko – Croatia

I have been noticing lately that after sending CQ and acknowledging someone that people are still trying to contact me. I like pileups for me but it’s hard in the digital world. It gets annoying because I’m unable to make out the first half of the conversation because of QRM. I figured like on SSB, once someone acknowledges someone else that everyone else on the frequency remains QRT until the exchange ends??? – END RANT

I also got work K2TPZ on CW. I still have trouble receiving so I cheated and used the computer to receive his CW and used the touch pad to send. I hope by engaging in CW more and more that the dits and dahs will automatically turn into letters and words

Tigertronics SingaLink USB

Recently I purchased a SignaLink USB from HRO in NH to replace my Rigblaster Nomic. The Reason for doing so is that the SignaLink has a built in sound card. That means only one connection to the computer is required. It also Isolates the soundcard so I do not have to adjust my computers sound card every time I want to use digital.

Price (@ HRO): $99
Platfrom Installed on: Windows 7
Radio Used On: Yaesu FT-950
Software Used With: Ham Radio Deluxe, WSJT

When purchasing the SignaLink you can either get one to adapt to your microphone jack or your data jack (If you have one). Since the FT-950 has a RTTY/PKT port on the rear of the rig, I purchased the SL-USB–6PM. The 6PM stands for “6 PIN MINI” which is what the RTTY/PKT Port uses (Similar to a Mouse/Keyboard cable).

The box comes with everything you need to get going. Included in the box was the SignaLink USB unit,6ft  USB-A to USB-B cable (Similar to current USB Printer cable), 2Ft of Rj45 to 6 pin Mini din cable (From the Unit to the radio), 1ft Male to Male audio (stereo) patch cable, Jumper wires, Allen wrench, Software CD (Contains Jumper Diagrams and Various ham radio software) and Manuals.

Nice Rear!!

The initial setup is very easy with the kit I purchased. Just plug the USB cable into SingaLink then into the computer, then plug the Data cable into the SignaLink’s RJ45 jack and plug the 6pin Mini Din into the rear (RTTY/PKT, DATA) Port of your radio.  Depending on your Operating system. The system will automatically recognize the SignaLink and install the default drivers for the sound card that is  in the SignaLink.

The software and radio setup could be a little confusing to some people. But it’s similar to any other interface that is out in the market. The only thing is is really different is that you will now have TWO sound cards  showing up on your computer (Your computers and the SignaLink). You will have to do some on software adjustments for the SignaLink sound card (Labeled “USB Audio Codec” or “USB Audio Device”) and you will have to modify your settings for each software that you use for communications. Tigertronics website provides a great amount of information on how to setup your SignaLink USB to your computer and will provide technical assistance over the phone\e-mail.


On the radio side with the FT-950 I went to menu # 51 (Data Out Lvl) and # 53 (Data V Gain) and changed the value to 90 to max out the levels. If I need to changed the RX and TX levels of the data port I can do so on the fly with the knobs on the SignaLink. I also changed FT-950 to display the ALC meter.

Now it’s time to pick a frequency and start doing some “Digital” Communications. I picked my favorite 14.070mhz. At this point I am adjusting the RX knob on the SignaLink to make sure I am not overdriving the DM-780 software. I keep my level around 40%. If you have the RX knob maxed out (turned fully clockwise) and you are getting less than 10% of audio then check the software settings on the “USB Audio Device” and the settings on your communications software (For example DM-780 has Attenuation level. That box should be turned off or at zero). If it’s still low then check your rigs Data Settings and max out the RX and TX gain

SingaLink In Operation

Once the RX is set, it’s time to start transmitting. Soon as you start transmitting adjust the TX knob so you see nothing on your ALC meter but the power is still at the level you set it at. The picture above shows that I set the power to 20 watts. in the PSK field you really do not need much power. I see a lot of people running high wattage which just makes it hard for others to communicate as they are causing QRM to stations near.

That’s It!

So far I am loving the SignaLink USB. My sound card is now free so that I can listen to music again. Windows OS sounds will no longer be transmitted (DING!), I no longer have to readjust my soundcard for digital. I can also use my microphone jack for it’s intended purpose; for plugging a microphone into. I can switch from digital to SSB in seconds!  I wish I purchased one of these with the radio.

* – I am not tech support for the SignaLink, I just want to show how I went about putting it together. If you have issues please go to http://www.tigertronics.com


Up, Up and Away! (Diamond X510 Installed)

This weekend I worked up the courage and installed my Diamond X510 on my roof. It wasn’t easy due to the pitch of my roof and lack of any safety gear and also making sure the ladder was secured to the house. I don’t picture myself climbing up onto that roof again.

In the above picture I designed and fabricated my own mounting straps to mount the antenna to the cast iron vent pipe.

The support pipe is  galvanized dipped and  then powder coated white to survive the elements

Here are roof brackets just after being cut with the 4kw laser. Brackets are made of 14ga (0.074) Staintless
All the hardware used in the installation was made out of stainless. I didn’t want a nice trail of rust running down my roof.

Other than the anxiety of climbing onto my roof , It was fun.  I couldn’t wait to get back into the house, run the RG213 through the wall and start transmitting.

Using Diamonds radiation pattern on the antenna I calculated the coverage of my antenna.

I think it calculated a little too much but it’s pretty close. From moving my antenna from 5ft off the ground to the top of my house using low loss cable and Type-N connectors, I see a major difference and wondered why I never bought a commercially built antenna. I notice that I can now hit stations further north from my QTH. before I couldn’t get past 10mi north. Now I can hit the W1UWS repeater on top of  Mt. Ascutney in Ascutney VT (100mi north of my QTH) and I could now hit Mt. Graylock in N. Adams MA  (60mi Northwest of my QTH) and many repeaters in the Berkshires. In the south direction I can now get repeaters in Litchfield and Hartford Counties in CT.  Compared to the J-Poles I can now contact 40 additional 2m repeaters. So overall I am extremely pleased of the results.

Now to get the Butternut Installed.


W1AW – Revisited


Having Friday off from work I planned to go back to the ARRL HQ located in Newington CT.  This time I took a tour and got to operate W1AW which was exciting. Upon arrival you have to check in with the secretary for either a tour and/or use of W1AW. I choose to take the tour since I’m interested . My tour guide was a very nice gentleman named Dan Arnold (W1CNI) who is a volunteer tour guide. He took me around the ARRL headquaters to different parts and departments of the building.

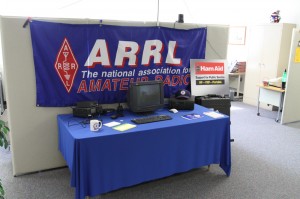
One area he took me was to the Ham Aid table.

These Ham Aid Go Kits consist of a couple of transceivers to help provide communications to disaster areas. Haiti and Louisiana were just a couple of places that received kits. Behind the partition are kits ready to be sent. It’s great to see that at least something is being sent.

Another area that I was shown was the QSL Department.

Rose-Anne, KB1DMW

Looks sort of like an old style mail room. It’s rose-annes job to sort all the QSL cards that come into the ARRL Headquaters by country destination, box them up and prepare them for shipping all around the world. It’s a nice sight to see that people are still using QSL cards in the electronic age where everything is “E” this and “E” that. I would rather get a QSL card in the mail than a E-QSL card.

The one area I wanted to see inside ARRL headquaters is the lab. However the lab is undergoing renovations and was completely gutted. They hope for completion in early April. So maybe another time I will go back to check out the lab.

Across the parking lot is the Hiram Percy Maxium W1AW building.

(Should have taken a picture of the building… Doi!)

Inside W1AW is some history on the ARRL’s Co-Founder, Hiram Percy Maxim. There is also 3 studios filled with transceivers, D-Star/Echolink desk and a bank of equipment used for transmissions of their bulletins. Licensed Amateurs are allow to use some of the equipment in W1AW. I got to operate 15meters SSB.

N1BMX AT W1AW

Here I am operating 15M at W1AW. It’s a little (just a little) nerve racking operating their equipment. First off, It’s not mine. I didn’t want to hit a wrong switch or change a setting that I was not supposed to. Another thing is that it’s hard to say a different call other than your own. But after a couple of minutes I worked Aruba, Italy and England. I just wish I had the equipment they had.

Frandy (N1FJ) at W1AW
Matt (W1MSW) At W1AW

While at ARRL I ran into four nice people that are members of a club that I recently joined. It’s a small New England world. One of which I took a class that he taught (No, Not grammer class!) on Ham radio back in the late 90’s.

Here is some of their equipment they used in broadcasting. So all of the CW runs and bulletins originate here.

Here is the desk with their D-Star equipment and Echolink setup.

Overall I had a great day and If time allotted, I would have stayed a lot longer and snapped more photos. If your a ARRL member and in the area during the weekday, I would stop in and either visit and/or take a tour.


My Diamond X510NA 2M/70CM Antenna

Last week I managed to get a Diamond X510NA antenna for free! The only issue was that I had to go and retrieve the antenna off the roof and also remove another antenna which I also got to keep. Not sure what the other antenna is but my focus is on the Diamond X510NA. This is my first “Commercial” VHF/UHF antenna. All my previous antennas were home brews which performed just great.

When I got the antenna down, nature has taken it’s course and there was corrosion of the visible metal parts and the white lacquer coating is gone exposing the fiberglass tube. However the tubes were still intact and the copper inside looked great for the most part

In this closeup you can see the minor issues that nature caused.


I was determined to get this antenna looking and performing like it was new.  So I went to the hardware store to look for plastic spray paint  and rubber foam strips for sealing  joints around doors to keep drafts at bay.

Here is a photo with the Rubber foam stripping rolled around where the old foam was. I am doing this to prevent the actual antenna from rattling around inside the tubing.

I designed a bracket to use for the roof  installation. The straps will be made out of 14ga (.074″) stainless and I already acquired a 1.25″ I.D. galvanized pipe and had it powder coated white to match the rest of the antenna. I don’t want any rust up there.

Here is the finished antenna. I mounted it to the deck with zip-ties to make sure the antenna works before going onto the roof.

Here is another angle of the antenna. The joints and feedline were taped with “X-Treme Tape” which is a silicone based
tape that will make a watertight seal. I also used “Undercoat” rubberized spray where the radials are mounted to prevent any more corrosion to the base.

There is a night and day difference compared to my home made antennas. Even though it’s 5ft off the ground and the huge aluminum siding wall right next to it, I am hitting repeaters that I never could hit before. Can’t wait to get this up on the roof.


ButterNut HF9V / Isopole 440

Today I went to the MTARA’s Hamfest located in Springfield MA looking for Anderson power pole items. Since I have not been to a “Hamfest” in 6 years or so, It looked rather small. Last one I went to was MTARA’s fest when It was in Amherst and It was 4 times the size. After talking with some people they told me that this “Small size” fest is actually bigger compared to the past couple of  years. That’s a good sign that there is more interest in Ham Radio in the Western Mass area. Hopefully it grew.  While at the fest I saw a box with some aluminum tubing and aluminum coils sticking out the top and thought it was a butternut antenna. After talking with the seller it was indeed a Butternut but That’s all he knew. He didn’t even know if it was a complete set. He was asking $60 I talked him down a tad because of the uncertainty of it being complete.  After getting it home and doing a quick assembly, It’s a complete used ButterNut HF9V with the 75Ohm matching cable and manual. So I am quite pleased and I hope this antenna performs better than what I was originally going to purchase (S9’s 43ft Verticle W/ 4:1 unun).

ButterNut HF9V
ButterNut HF9V

Can’t wait to get this project going.  Hopefully the 90Ft of RG-8x will reach. The only fabrication I plan on doing to this is making a Stainless Ground Radial plate to mount the ground radials onto.
At the MTARA’s Hamfest I also picked up a ISOPOLE for 440mhz. I purchased to see If I can duplicate the antenna. It appears to be either a 1/2″ or 5/8″ Solid Aluminum Rod with a couple of 0.030 aluminum cones with a small lock seam (Pittsburgh lock?), Fiberglass insulator, Hose clamps and N-Type connector. I have not really looked at it other than putting in my attic just to see how it performs compared to my other 440mhz Antennas.  Quick test shows that it performs a little bit better than the Copper cactus and my Dual band OSJ-Pole.  Once the weather get’s nice it might end up on the roof.

IsoPole 440
IsoPole 440

Last stop I made to the Hamfest was to HCRA table and purchased a membership. I like to support the local ham clubs so this was the day to do it.

Back on The AIR

N1BMX is now back on the air. I went out and purchased 92ft of Jetstream JT2015F Coax that replaced my mutilated Belden RG-58A/U.  I guess the JT2015F is supposed to be  a knockoff of the Belden 9913F. So far I am liking it. Not really noticing a major difference compared to the much thinner RG-58 but it’s better than having none.

Since last night I managed to make some contacts with the following people

KC9ISJ (PSK 31 40m) – Randy – IN, US
OK1VPO (PSK 31 40m) – Milos – Czech Republic
P43E (USB 20m) – Emily – Aruba
W4HOZ (USB 20m) – Noel – MS QSO PARTY
K5DWI (USB 20m) – Bob – MS QSO PARTY
N7QU (JT65 20m) – George – OR, US
EA1HQN (PSK 31 20m) – Jose – Spain
LA8WRA (PSK 31 20m) – Arnfinn – Norway (First Norway Contact!)
RA4AJK (PSK 31 20m) – Alexander – Russia
DL8UFO (PSK 31 20m) – Fritz – Germany
OK2UYU (PSK 31 20m) – Jaro – Czech Rep.
DL1BA (PSK 31 20m) – Vasily- Germany.

I plan on getting a Vertical antenna to place in the back yard.

W1AW

Since I live about a half hour away from W1AW and I was in the area I decided to stop and see what the ARRL headquarters looked like. Since it’s Saturday the place was pretty much closed. Wish I had the antenna farm that they on their front lawn. Someday I will have to go back when they are in operation.

Snow blowers And Feedlines don’t Mix

Since New England is having a horrible winter I have not been able to do much HF work.
Last week while snow blowing a path in my backyard I accidentally hit the feedline going to my G5RV with my snow blower and will no longer be able to get on the air until it’s fixed. I am going to take my time and replace the RG-58 cable with LMR400uf cable and possibly add a S9-Antennas 43′ vertical in the back of my yard with a remote tuner.

Hope to make more contacts soon But it looks to be at the end of April with the 50″ of snow in my backyard.