NEQP 2015 Soapbox

This past weekend was the New England QSO party (NEQP). There was also 7th area QSO party, Indiana QSO party, and Delaware QSO party happening during the same weekend. Even though I love contesting, I really don’t do much from my house because it does create a disturbance and I would like to keep that at a minimum. However I do make an effort to participate in CQWW SSB and NEQP. I really like NEQP because I’m the wanted station and a lot of local operators are active on HF. Now that I have a new beam and a new radio, I wanted to really see what I can do with it compared to years past.

QSO Party VS. Contest

Some people put QSO parties into a different category when compared to contests like CQ World Wide. QSO parties are advertised to be more laid back and welcoming to new hams and new contesters. So you will see a lot of different operating habits. You will see more conversation, real signal reports and you will see a mix of seasoned contesters, new contesters, award chasers and even old timers. Large contests like CQWW are about making the contact as fast as possible and as many as possible.

Getting Ready

There wasn’t much I had to do to get ready. I’ve recently installed the DVK/DVR in the K3. It’s a device that can record and play audio clips. This is a great tool in contesting because I can record things like calling CQ and even the exchange and play them over and over. I much prefer using the recorder in the K3 than using wav files over my soundcard. I found that when using .wav files and a soundcard interface, the audio sounds much different from the radio’s microphone. With the DVR/DVK built into the K3, I can control it using the logging software and the audio is pretty much match up.  It helped out quite a bit during the contest as my voice was dropping out.

Let’s Go!

What I like about NEQP is that it starts at 4pm local time. I am not sure if they do it because of the New England Amateur Radio Festival  (NEARfest) or for other reasons but I had plenty of time to get stuff done around the house.  Soon as 4pm rolled around, I was on the air.

nt1kneqp15sm
(Me During NEQP 2015)

I didn’t spend the entire time on the air. I’m not as serious as other contesters that have an iron butt and won’t move from the chair. I went to the park, fixed some things around the house and did some other things instead of contesting. Even when I was on the air, I wasn’t really serious as some others might be. I was chatting it up with people, giving honest signal reports, trying to help people with audio issues and even ragchewing with other operators. Even though I would like to win my county, it was more about having fun. I’ve received many compliments and tried to give out as many as well. The last 20min of the contest I was in “contest mode” trying to hand out contacts as fast as possible. I have yet tried to participate in a contest from home that involved fast contacts. I’ve only done “Contest Mode” during multi operator events at other stations

Pan adapter usage during contesting

Even though I was mostly calling CQ and not bouncing around looking for contacts, I had the pan adapter running and I felt it made a big difference. I can switch to a band and see that it’s not alive instantly. I could also find “holes” in the band much easier for me to park and call CQ. It made it much more easier and faster to get up and running.

Differences between years past

Having a new antenna and a new radio does make things feel different. The K3 performed well as expected. I think the K3’s DVK/DVR (Digital Voice Recorder) is worth getting even if you have a soundcard interface.  I also purchased the 1.8 Khz filter knowing that I will be doing contesting where the bands could be packed. At first I wasn’t a fan of how the filter sounded until it was suggested by Jim (KK1W) to shift the filter. Adjusting the shift made a world of difference and I was able to enjoy what the 1.8kHz has to offer. The bands weren’t as packed compared to the likes of Field Day or CQ Worldwide but it helped with stations that were QRP or in the noise. I purposely setup shop near other stations calling CQ for NEQP and didn’t get much interference from strong near-by stations. Every once in a while someone would setup shop in my passband. Most times it’s an accident but sometimes they do it on purpose with hopes that I would move. depending on the band, I might move slightly up or down but most times I just stay on the frequency and eventually it will clear up. However it does cost me potential points.

Having a beam also made a huge difference of course. When it was just the G5RV, I had a hard time working West Coast stations but that changed. It seemed like I had a pipeline into the Southeast as the majority of my contacts where from 4 land. I’ve also worked some South American DX stations and a couple EU stations off the back of the beam. Even though I was communicating with a narrow signal both in TX and RX, I still received many compliments about my audio with the exception of one person who said I was too narrow for a QSO party. I didn’t want to step on anyone’s toes using a wider bandwidth.

However the biggest difference compared to previous years is that I didn’t have to fight anyone on the air. Every previous NEQP, I would end up getting into an argument with someone because I dared to operate near their precious net or someone would purposely jam me. This year I had none of that. Everyone I contacted was nice and wasn’t interrupted by a net or some other type of rag chew. I am not sure if was because the bands weren’t in great shape, that I have new gear, more experience or a combination of everything? Who know, maybe my previous setup was causing more harm during contests.

Getting Spotted

NEQPspots

With NEQP, I didn’t use the cluster or any kind of spotting assistance.
I had no idea that I was being spotted but I had an idea when I was getting a trickle of contacts then all of a sudden I was getting pileups out of nowhere. Thanks to those who spotted me.

Overall Experiences

I had a great time. It would have been better if my voice wasn’t cutting out but it was great.

neqpscores15

Overall I made 664 contacts. Most of them were on 20 meters. However I am impressed with my 40m contacts as I was using my G5RV to make them. 40m helped out with a lot of local counties. My claimed score is 36,521 points. I didn’t think that was a good score until I started comparing them against other claimed scores on 3830scores. I also need to look at my log a little closer because you will see that I made 619 SSB points but yet I made 664 contacts. I feel that something is not correct with my log. It’s possible that the DE contacts I made for DEQP are counted as errors because I put their county as part of the exchange. So it’s possible I have 39K points.

Improvements for the future

After looking at what’s coming through 3830 scores, I have a high amount of SSB contacts. At this point in time, I have the most SSB contacts on 3830 for my category. but yet I have half the points compared to the CW only ops. This means I really need to know CW in order for me to place higher in future contests. I have now set a goal to make at least 60% of my contacts in next years OSO party on CW. I can’t really do much to improve my signal or my SSB rates so I will have to start looking at CW for the points.

I had fun, thanks for reading.
Jeff – NT1K


New QSL Card… Finally

About 5 years ago I received my first QSL card in the mail. I didn’t really have an idea what to do with it but  I knew I had to respond with a card of my own. Since then I’ve received many cards both domestically and from the bureau. I  need to make a card for response before I get more overwhelmed. Some of the cards I’ve received are well thought out and have really excellent quality. I didn’t want to reply with some generic card using one color on card stock. I wanted high quality glossy cards and I wanted to put some serious effort into the design. Well… That was 4 years ago. I still don’t have a card because I set my goals too high. That was until I found my doppelganger. There is a person out there that looks very similar to me. He Photoshop himself into a couple images and one of them made me burst out laughing. I thought it would be a great QSL card. The picture was of him riding a “40 ounce” bottle of in space with rainbow coming out the end of the bottle. Instead of a bottle, I thought it would be funny if I was riding my K3 instead.

One night I finally decided to do it. I setup my camera on a tripod in my shack, sat on a stool and took some pictures with me holding a bottle of beer.

First Draft. 

After some Photoshop work later, this was my first draft.

NT1KQSLOG

I thought I was done and posted it up on twitter and some amateur radio related chat rooms I hang out in. Suggestions started pouring in on what I should add to the card to make it even better. At this point I didn’t care and wanted to go for shock value. So I added almost everything that was suggested. However I didn’t want the additions to take away from me riding a K3.

Here was the final image I’ve sent to the printer

QSLFinalNB

Now it’s a very busy card. They are mostly filled with internet memes along with some semi-random stuff.
An internet meme is  “an idea, behavior, or style that spreads from person to person within a culture through the internet” according to Wikipedia.

I will break down each one.

On the top left you will see a man peeking out from the side of the card. That man is Chris Hansen from NBC’s dateline.

Chris-Hansen-Take-A-Seat-Meme

He’s known for his “To Catch A Predator” series where he catches child predators.  This image is often used across the internet when someone makes certain comments about underage people. There is no particular reason I used it other than it being a suggestion from someone on IRC.

Right below Chris is Wilford Brimley

54679860

He’s an actor that appeared in many movies and television shows but on the Internet he is known for his appearances in commercials for a medical supply company. The commercials focus on Diabetes related supplies. The commercials are sort of funny because of the way he pronounces Diabetes as diabeetus. He is often used when people are discussing deserts, candy and the obese. I can actually relate to this because I have Type II Diabeetus. When someone suggested to use him, I went with it right away.

Between Chris and Wilford, you will see the Kool-Aid man.

ElecraftOhyeahKX3

Except I photoshopped the Kool-Aid man to be holding a K3 and KX3 and saying Elecraft instead Oh yeah!
Even though at times I may be critical of Elecraft, I own a couple of their radios. People often say I was “drinking the kool-aid” which is a term that is associated with giving in because of popularity, peer pressure or persuasion. It can be also associated with those who have a strong belief of something without really looking into it. This references the Jonestown Deaths where cult followers lead by Jim Jones consumed poisoned flavor drink (it was actually Flavor aid) which caused the deaths of over 900 people.

In various internet forums and chat rooms I frequent, I often joke around saying that you should only purchase Elecraft products. The same way some might tell you to get a mac, pc, or android device.

To the right of the Kool-Aid man you will see a teletubby.

purpletubby

I added the purple teletubby for no reason other than it was suggestion to add it from Tom, @AJ4UQ on Twitter.

Teletubbies is a BBC childrens TV show that ran in the late 1990’s. If you ever look at the teletubbies in the group you will see something familiar
telebig

Look on the top of their heads. You have a Delta Loop, Vertical, Magnetic loop and a Vertical with a loaded coil antennas.
Even though they are supposed to be TV antennas, They have some relation to ham radio. I went with the Delta Loop

To the right of the teletubby is a T-Rex trying to eat bacon

Dinobaconsmall

Both were suggestions by those in the Internet Relay Chatroom (IRC) #redditnet on irc.geekshed.net . Since I love bacon I figured why not put it into the card. I am not a fan of the T-Rex but it’s the most recognizable dinosaur so I figured to use it instead of a triceratops which is my favorite.

Below the T-Rex is Giorgio Tsoukalos, AKA the “Ancient Aliens Guy”.
This is a really famous internet meme of Giorgio from one of his many appearances on the show “Ancient Aliens”. The show tried to connect origins of technology used in history to aliens. He was singled out because of his very noticeable hair style that appears to get larger throughout the series.

historychannelprogress

I don’t really know why I put him in the card other than being an internet meme. However it’s a joke in my house that aliens were responsible for anything that happened but could not be really explained. “Who spilled the cereal all over the floor? Aliens!”

Finally, to the pièce de résistance. Me riding a K3  expelling rainbows.

QSLFinalK3ride

Me riding the K3 is an idea I saw from my what is known as my twin on the internet. He was riding a 40oz bottle of beer. I am riding my K3.  Frank (KG6EYC) from FBOM suggested that I should the K3 into a Nyancat which is a very popular internet meme of a part cat, part pop tart flying through the air with a rainbow trailing.

So instead of a pop-tart and Nyancat, it’s now a K3 instead of poptart and we call it Nyancraft.

On the very bottom of my card you will see my 3 element yagi tri-bander. The card is now complete.

So what the deal, I don’t get it?

That’s the point. It purpose was to make people go “What the heck is that!?!”. Since I know in the amateur radio community there will be a few who actually get what’s going on, it will confuse most. It’s not some plain boring 2 color QSL card that will be glanced at and thrown in a drawer or in the trash. This card will be looked at. So I did it just to be different. There are no hidden meanings or messages. It’s was done just to be different.

If you receive my card, I hope you enjoyed it. I’ve been backlogged with cards for about 4 years now so I am replying to all those who sent me their QSL cards with a SASE first. Then I am sending out cards for twitter and reddit contacts. after that I will reply to all domestic cards and finally I will make a batch for the bureau that will included replies and much needed entities.

If by any chance you are offended by my card or you feel it has hidden messages or meanings then I think you need to lighten up and not get easily offended. It was meant to confuse not to offend.

If you enjoyed it. Thanks!
– Jeff, NT1K

More Kool-Aid Please! New Rig In The Shack


ElecraftOhyeah

Along with recent antenna improvements I felt I needed to improve my rig. I had the Yaesu FT-950 that provided me thousands of contacts, countless hours of entertainment and awards such as DXCC and WAS.  It was an excellent radio but it also had its issues. The most annoying thing for me was the menu driven system that Yaesu loves to use. In order to adjust some of the DSP settings or even the power level, you had to dive into the menu system. To make things worse, Yaesu decided to abbreviate the menu items which makes it almost impossible to adjust without memorization or referring to the manual. However the FT-950 was a good radio, I never had a problem with it and received many reports about how good and clean my audio is. It just worked. The IF output option from RF-Space was a big plus. I could have kept using it but I felt I just need a new radio and sell the FT-950 while it still has value.

What to get?

I wanted a new radio but I wasn’t sure what to get. My budget was a little over $2,000USD. I had to sell most of my station off to obtain the funds needed for a new radio. This left me with a decent amount of choices. I can choose either the Yaesu FTdx-3000, Kenwood TS-590SG (The new version), Flex 6300, ICOM IC-7600 or the Elecraft K3.

FTdx-3000 – Didn’t want to get another Yaesu rig. Looked more menu driven than ever and wanted to stay away from having to constantly dive into menus. Not saying it’s a bad rig, I just want something other than Yaesu.

TS-590SG – Great radio and really great price. Obtaining IF output is very difficult. If they were able to have an IF output, I would have purchased the TS-590SG

Flex 6300 – Very tempting.  I love SDR and love being able to scan an entire band in one shot. Point and click tuner with one heck of a receiver and filtering is a plus. However it’s not a proven contest rig, it’s dependent on a computer for operating and I am not a fan of having to pay for software upgrades. Still very tempting.

Icom IC-7600 – Excellent radio but the price is too much for me.  I also think for the price they would have a better receiver compared to my other choices. I’ve used the 7700 multiple times and really love the radio. It’s more fitting for 756-Pro users

Elecraft K3 – Even though I am not a fan of the ergonomics and the cheap looking aesthetics, it’s a proven contest and DXpedition radio. People often compare their radios to the K3 which means a lot. It has a very excellent receiver and you can basically make the radio work for what you need it for. It can be a $1700 radio or a $7000 radio depending on what you’re willing to spend.

As you may have already guessed, I’ve decided on getting a K3. It seems to be the best for what I’m willing to spend. Even though I wanted something that was new on the market, The K3 still met my requirements even though it’s already a 7 year old radio. The amount of available options and excellent receiver is what won me over. The K3 also allows me to build up the radio over time. When one of the big 3 discontinues a radio, they often discontinue options/upgrades for that particular radio making it much harder to upgrade the older it gets. By going to Elecraft’s website, you’ll see they’re still offering previous radios as well as their options/upgrades. That means I won’t have to worry about the K4 (if there is a K4) coming out and losing out on possible upgrades for the K3 over time.

You already have a KX3. Why not purchase the KXPA100?

I purchased the KX3 as a portable rig to use for things like Summits on the Air (SOTA), Parks on the air (POTA), camping and other portable operations. Even though the KX3 has an excellent receiver, It couldn’t compete with the possible options the K3 has to offer and I honestly didn’t want a mess of cables on my desk in plain sight.

If someone from elecraft reads this, I would suggest to add a docking port on the KX4.

Kx4dock

Have a slide cover on the rear that would expose an MCX connector and a pin header that could be used to plug into a dock or cradle that is attached to the KX4PA100 to make it look like a base rig.  That would avoid having a bunch of cables coming out the side of the KX4 when it’s “at home”. Maybe put a better speaker into the docking bay. If this was available then I would have got the docking amp over a K3. Having a Dual purpose radio without the mess would be nice.

Okay, out of fantasy land.

Getting The Radio

Being the cheap Ham I am, I had to come up with the funds to purchase the K3. I sold my FT-950, FT-736R and almost everything that I didn’t need in my shack that I’ve purchased over time. I was able to get enough saved up for just a basic K3 in kit form with no options other than the 100 watt PA. I ordered it Christmas week and figured it would be awhile before it would show. Elecraft did a really good job getting me the radio quick. I’ve learned USPS from CA to MA is much faster than UPS.

A Little Overwhelming

20141227_153235


I was very excited when the packaged arrived and I wanted to tear into it. However I knew I should carefully read everything to avoid having a $2000 brick on my table.  I opened up each box and was overwhelmed by the amount of bags and envelopes containing just nuts and bolts. I couldn’t imagine if this were to be full-on solder kit.

20141227_160107

The first hour was spent making sure every single nut, knob, board and panel was accounted for. Thankfully everything was accounted for and even had extra parts. I didn’t have to jump into the “Spare Parts” bag.

20141227_154138

My only suggestion is to keep the parts and fasteners in their respective bags and envelopes. Don’t dump everything into one big sorting case because you will be working in stages and some require special sized screws.

20141227_163540

I also had an organizer box with little post-it notes stating what is in each slot. That helped quite a bit

It’s Assembly Time

Now that everything is there and counted for. It’s time to assemble. I decided to stream my assembly which gave people some insight as to how one is assembled. I managed to record 1/3 of the build.

You could watch the video but I admit it’s real boring. I was even bored. There are a ton of assembly videos and there are a ton of website/blog postings about the assembly of the K3 so I won’t bother going into great detail.

The build went quite smoothly and only had two moments of stupidity. The first was that I missed some masking left on from their metal fabricator/powder coater on the front panel and noticed After the front panel was sub assembled. A razor type blade and a pair of needle nose pliers took care of it. My other moment was that I plugged the synth board into the wrong spot. However I caught that before it could cause any trouble.

Overall it took around 5 hours to build. I don’t know how long it normally takes but I wasn’t trying to win any time trial. I wanted a working radio and I didn’t want to hear screws bouncing around the case a month or two down the road.

Is it worth getting the kit version over the assembled version? That depends on how much you value your time. I value my time but knowing I could apply the savings to options, I’d  much prefer the kit. Plus I get to get hands on with my radio and see what part does what.

It’s alive… It’s alive… IT’S ALIVE!!! 

20141228_220524

Once the radio was on and calibrated I wanted to get on the air. Thankfully a couple of people were watching my stream and hopped on the air willing to make contact with me. I scrambled to get on the air but had much trouble because I installed the filter in a different spot. I’ve read the assembly manual over and over but failed to read the operation manual which made getting on the air a little tricky. For some reason the speaker wasn’t working and couldn’t get the filters to default to the spot I put them in. After a couple minutes I was on the air and made my first contact with a local. It’s was really nice to know it actually works. After making a couple contacts, I went back to work and installed the 100W PA.

Initial Thoughts

After messing around with it for a couple hours I started to get buyers remorse. It felt small and it felt cheap. The main VFO didn’t have that smooth action that I am used to. It felt like I was turning a sanding disk. Nothing was impressing me which started to make my stomach turn as if I just wasted all the time, effort any money for something that was less than what I had before. It felt like my dream rig was being crushed right in front of my eyes.

But then I tried making a voice contact with someone in the noise on 80M with a strong signal nearby. I narrowed the filter and shifted the IF and that took a lot of the nearby signal out. Not bad considering all I have is a 2.7Khz stock roofing filter. I then applied noise reduction and that weak station that I could barely catch a couple words is now coming in much clearer. I can now fully understand the DX and managed to make contact. The adjustment took just a couple seconds and that knot in my stomach started to fade away the more I dived into the K3. I am now satisfied and I now feel I’ve made a wise purchase.

Let’s Compare the K3 to the FT-950

After playing around with the K3, I started comparing the mental notes I had about the FT-950 against the K3.  The K3 pretty much beat my FT-950 in almost every aspect… almost. The FT-950 looked better and felt better than the K3 but that doesn’t really matter in a contest on an extremely packed band. The FT-950 has an excellent receiver but it shadows in comparison to the K3 with even just the stock 2.7Khz 5-pole filter installed. I guess I traded an aesthetically pleasing radio for one with better performance.

The K3 even does things right out of the box that I wish the FT-950 could do. With the K3 I am able to switch from a desktop microphone to a pair of headsets quite easily because the headsets could be plugged into the back. I could get away without using an soundcard interface since there is  audio line in/out ports. I could use the headphones and have the internal speaker working at the same time which is good for field day. I have two custom buttons that I could program macros in that would allow me to do many things.

What makes the K3 really stick out in comparison is that I rarely have to dive into the menu system to make adjusts to the DSP or even the RF power level. When I do have to dive into the K3 menus. It’s much easier to navigate. I flat out hated having to dive into the FT-950’s menu system. It wasn’t in really any order and it was abbreviated or numbered. If I haven’t been in the menu for awhile, I would have a real hard time trying to adjust simple things like DNR/DNF and even my TX bandwidth. It’s much easier in the K3

What’s next with the K3?

I purchased the bare minimum when it comes to the K3 with the exception of the 100W PA. Now that I’ve played with the K3, there are some much needed options that I am starting to save for. Of course I would like a completley decked out K3 with EVERYTHING but that isn’t going to happen.  So here is my list of options I would like in order of importance starting with what I feel is the most needed with a short reason why

KXV3A – RX Ant, IF out, Xverter Interface – I love SDR and want a Panadapter
KFL3A – 1.8K – 1.8 kHz, 8-pole filer – For SSB contesting and packed bands
KDVR3 – Digital Voice Recorder – For SSB contesting, Can control with N1MM. No more WAV files
KFL3A-250 – 250 Hz, 8-pole CW Filter – For when I get into CW.
KFL3A-6K – 6 kHz AM / ESSB, 8-pole Filter – I like ESSB at times and would need this
KBPF3 – General Coverage RX Bandpass Module – I listen to more than just hams. I have SDR rig for now
K3EXREF – External Reference Input – I am bit of a time nut. I would love to use either a GPSDO or Rb Atomic Clock.

That is my “wanted” list. Of course I won’t be purchasing it all at once but I would like to have at least the 1.8Khz filter and DVR options before field day. You won’t see the 2nd receiver option unless I win the lottery. I am interested in SO2V and even SO2R operation but I would rather go all out on SO2R. I never felt a need for a sun receiver so I’ll save my pennies for something else.

Overall thoughts

It was a fun build, dealing with elecraft was great (because i didn’t), assembly went great and I don’t have buyers remorse (anymore). It’s an “American” radio and it’s a damn good one. Hopefully I don’t drown in the kool-aid

Thanks for reading!
– Jeff (NT1K)


New Beam In The Air and I’m Swinging It Like I Just Don’t Care.

Since I got my first HF station up at my house, I’ve only used the G5RV (Both Jr. and fullsize) and the 10M dipole in my attic which is surrounded by aluminum siding. With these antennas I’ve been able to make thousands of contacts. I’ve manged to get  basic DXCC and WAS awards. Even though a lot of people harp on the G5RV, it provided me countless hours of contacts and I think  it was well worth putting up. I would still suggest the G5RV or its variants to others.

However I think I pushed the G5RV as far as it could go. The antenna has since stretched. More ladderline is laying on the ground. New entities are getting harder and harder and there are bands I haven’t really explored. 10 Meters on my G5RV hasn’t been really good to me and the dipole wasn’t going to cut it since it was basically surrounded by aluminum. I was also starting to get bored. I would only hop on to see if I can work a DX expedition or random JT-65 contacts. I needed an upgrade.

My first solution was to get a multiband vertical. In 2011 I purchased a used Butternut HF9V at a local hamfest. In 2013 I finally buried some coax and installed the antenna with a bunch of radials.

gBdIlsE

Upon getting it on the air, I found that it wasn’t really a performer. In a lot of cases, the G5RV was much better. The HF9V didn’t really give me the “WOW” factor I was looking for. But it work so it stays in my backyard. I needed something better. I needed a beam.

What Beam Should I Get?

That was one of the many questions I was asking myself. I didn’t want anything massive or anything that would require a large tower or rotor. I kept focusing on a Hex Beam type antenna, log periodic or a 3el tri-band antenna like the Mosley TA-33jr or Cushcraft A3S. I ended up going back and forth between the K4KIO type hex beam or TA-33.

The Hex Beam offers more coverage. It’s possible to get 20 through 6 meter coverage which includes the WARC bands. That’s 6 bands. In simple terms, it’s basically a 2 element beam with the elements folded in such a way that it still works. There is a claim 5dbi  (or 2.95 dbd) gain. The claimed F/B (Front to Back) varies from approx 25db to 30db depending on the band.  So in theory with perfect conditions and zero loss, if the antenna was fed with 100W, it would radiate around 192 watts. The hex beam would also attenuate signals from the back of the beam by 27db.  This allows you to hear signals better in the direction it’s pointed in.

The TA-33jr can only really be used on 20, 15 and 10 meters. The antenna could be adapted for other bands with the addition of the WARC kit. The TA-33jr has anywhere from 5.8 to 8.0 dbd  or claimed gain (or  7.95 to 10.15 dbi gain) and has a claimed front to back ratio of 20db. So once again, in theory with perfect conditions and zero loss, if the antenna was fed with 100W it would radiate anywhere from around 380w (on 20M) to around 631w (on 10M) and would also attenuate signals from the back of the beam by 20db

These comparisons are based from figures provided by manufacturers. That doesn’t mean that is how the antenna will perform in real world conditions. Things like height about ground, the type of ground, coupling to nearby antennas or other thanks and losses from coax and connectors play a major role in the performance and efficiency of the antenna.

On paper, the TA-33jr offers more gain on 10, 15 and 20 and looks easier to assemble but the multi band hex type beam has a better front to back (F/B) and offers more gain on the WARC bands. The TA-33 types of antennas have been in use much longer than the Hex type. If you were purchasing a beam on a small budget, the TA-33 type of beam would be much cheaper on the used market because they have been in use for decades (at least 50 years). I’ve seen TA-33 in decent shape for as low as $100.

How am I going to Mount The Beam?

No matter what I decide, I would need to mount the antenna to something. My first option was to obtain a tower and have it bracketed to my house at about 70′ in height. However that did not meet XYL approval because of possible guy wires in the yard and I want to keep my neighbors happy. Since a bracketed tower is out of the question, my next best bet was a roof mounted tower. My house at the peak is approx 40 feet above the ground level. With a 9ft roof tower and decent mast, I could get my beam 50 feet above the ground.  So a roof tower it was.

Going Shopping

I priced out a new Hex Beam from K4KIO, 9.5′ Tower from Glenn Martin, A new Rotor and Rotor Controller (Yaesu G-450), Mast, thrust bearing and cables. The price tag totaled almost $2,000. That is something I can not afford. However I was able to find a used TA-33, 5ft tower and rotor for much cheaper locally. I ended up purchasing the TA-33 package over the hexbeam. I am losing out on the WARC bands but the price made up for the loss.

A Pile Of Aluminum

20140428_192051

Upon receiving the antenna, I noticed right away it’s not a TA-33 that I thought I was getting. The Boom is 2 inches in diameter and longer than the TA-33jr. After a little bit of investigation, I found that the antenna is a CL-33 or a TA-33 Classic. The CL-33 is 6ft longer and provides slightly more gain and slightly higher F/B ratio compared to the TA-33jr. I was trying to go as small as possible but since I already have the beam, it will have to do.

The tower and thrust bearing was in great shape but the rotor appears to seen better days. The terminals were rusty and the rotor would “struggle” in certain areas when turning it without an antenna attached. I need to restore the rotor.

20131231_093936 20140102_161827

I stripped the rotor down and found a group of really rusty ball bearings. I soda blasted and powder coated the case, ordered new ball bearings, new brake parts and a new style connector. After some cleaning and re-wiring, the rotor is good as new.

The antenna was taken apart and traps were checked for debris and broken parts

20140801_185843

For the most part the traps were clean but some of the coils had cracks and even chunks of plastic missing. I ended up filling the cracks and voids with epoxy. Worst case is that I would have to get replacement traps. Being such a well-known antenna, it’s little easier to find parts.

After repairs I cleaned all the aluminum with scouring pads and applied an Anti Oxidation grease that will prevent the sections of elements from sticking to each other. I also applied anti-seize lubricant on clamps and other things.

20140803_181256

I did a test fit to make sure everything is working and bolting correctly to the tower. You will notice a different rotor.

20140803_181936

I have went with a Yaesu G-450 rotor because it was almost new and got it for much less. You will see WRTC spray painted on the rotor. It was used during the World Radiosport Team Championship (WRTC) here in New England. It’s not as heavy-duty compared to the Ham IV but I feel more safe using it.

There was only one concern I had with the tower and that was protecting the thrust bearing. I didn’t want rain, snow and ice to build up around the TB so I designed and fabricated a cone to slip over the TB shedding away anything from above.

20140812_125302

Now it’s time to test the boom mounted to the mast

20140817_133716

So far so good. The only concern I had was that the cone now provides a great home for hornets. I guess we’ll see.
The tower and antenna are now ready to be mounted on the roof.

Hurry Up And Wait… Now Hurry Up!

House

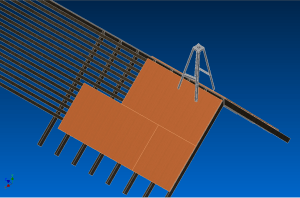
Now we have to get the tower mounted to my roof. I decided the best course of action is to mount the tower towards the rear of my house. That will allow the beam to clear a near-by tree and it makes it less visible from the street. Two trees in the front of my house hides the tower and beam quite well. I might provide some signal problems but we’ll see. I planned on using 10″ carriage bolts going through the roof into my attic and brace it using 2×4’s and a metal channel spanning over multiple rafters. I designed everything in CAD and put it through stress analysis. According to the results, it looks good.

Here is the problem. I don’t like going up on my roof. When I installed my X510, I almost fell off the roof and sort of been scared since. I don’t have the proper equipment to go up on my roof safely. the 10:12 pitch takes a toll on me. I am also stubborn and have a “do it yourself” attitude so I put the project off. It was planned to be put up in April before the New England QSO Party, but it’s now November and I still don’t have a tower on the roof.

I needed some roof work done before it got real cold outside. I had to hire a roofer to install venting and asked if he could install the tower at the same time.

20141101_163234

Thankfully he agreed and there is now a tower on the roof. Ignore my leaning diamond X510. It could have been prevented from leaning if I used a couple of self tapping screws. Due to the weather and hourly cost of the roofer, I decided not to install the antenna on the same day. Let the neighbors sort of get used to the tower on top.

TowerBrace

From inside my attic, I braced the antenna using 2X4’s and a large metal U channel covering 5 rafters. Very sturdy.

I Wanted To Get It On The Air

There is an upcoming 10M contest in December that my local club is involved in. I wanted to participate and I know my G5RV, HF9V or my 10M dipole wasn’t going to perform. I finally folded and contacted members from my local club to come help me install the antenna. A lot of people responded and on cold windy Sunday in December, a bunch of people came to my house to help install the beam.

TowerEd

A Major thanks to Ed, KB1NWH for staying up on my roof for hours.

We removed the Diamond X510 as it would be in the way and decided to assemble the beam on the roof since the tower isn’t tall.  We then installed the boom, each element and then the Diamond X3200. I didn’t want the X510 on the mast as it’s a much larger antenna.

NewBeam1

Finally. I now have a beam! There is still cable work to be done but everyone was able to leave in just a few hours. I was on the air just after noon.

I would like to thank Ed (KB1NWH), Jim (KK1W), Steve (N1SR), Frandy (N1FJ) and Dave (AA1YW) for taking time out of their life to help me get an antenna on the air.


What’s the difference?

I never had a beam before and I have no clue how one would perform at my house. I hooked my radio up to a A/B switch so I can switch between the G5RV and the Beam. The bands were not great when I finally got on the air but I was able to hear a lot of West Coast stations on 20M. I had a real hard time getting my signal out west and was amazed to see the difference. Stations that were S2 on the G5RV were coming in S8-9 on the beam. The front to back ratio was okay. I was pointed to EU and hearing a Texas station at the same time. When pointed to EU the Texas station was S7 and when I turned the beam toward the Texas station, he became a S9+. I will have to do more comparisons.

Here is a quick and dirty A/B video I did for a Fellow redditor. I should have found a week station but that will be for another video. I just wanted to show the obvious difference in antennas.

Contest Time

Having the beam on the air for the ARRL 10M contest was great. I have never participated in it and felt the beam proved to work quite well. 10 meters was open to Europe both Saturday and Sunday morning. I did about 100,000 points which is not bad considering I operated only 10 hours using low power (Around 100W) and was not using spotting assistance. I knew I would not win SOHP so the amp stayed off.

Overall Feelings

I should have done a beam much sooner. Or maybe I shouldn’t. Starting off on wires provided a challenge. With the wires I was able to make contact with a lot of operators and even won some awards and contests. Now that I have a beam, hopefully it opens up the door to even more contacts with those ham radio operators around the world. My signal will now be a little bit stronger and I will be able to hear farther away. Getting the beam on the air has renewed my interest in actually getting on the air.

Thank for reading,
Jeffrey Bail (NT1K)

ISS We Meet Again

It appears that the International Space Station (ISS) was transmitting slow scan television (SSTV) off and on for the past couple of days. The Russian ARISS team was transmitting images commemorating the 80th birthday of Yuri Gagarin, the first human to orbit earth. It was being transmitting from the Russian service module using only 5 watts of power. I wanted to see if I can get one of these images on my own. They were using 145.800Mhz as the downlink frequency so at least I have the radio for it.

It was advertise that they were going to be transmitting on December 20th starting around 12:40z and will end around 21:30z . So from about 7:40am to 4:30pm locally which is almost a 9hr run. Due to its orbit, it only allows me a couple of chances to receive the transmissions

ISSpass3

Due to work schedule, I was not going to make the 17:17z pass so I concentrated at 18:52 because the elevation would put the ISS right over my house instead scanning the horizon. It was my best chance.

At around 1:00pm, I made sure everything is in working order. The equipment I was going to use was a Radio Shack police scanner, Elk antenna, my laptop with a USB sound card, audio patch cable and the software MMSSTV.  At around 1:30 I took everything to the much colder outside and setup shop. Now that I think back, I should have also setup my home 2M using the vertical antenna on my roof to decode as well.

20141220_135105

I stated waving the antenna around at 1:50  and finally around 2pm is when I started hearing the ISS. If you want, you can watch the following video. Please ignore everything wrong. I thought of recording it last second and would have at least not wear my work clothes.

Once I locked onto the ISS, It was already too late. The ISS was already transmitting an image. But I was able to decode the majority of the image

Hist5

That’s not bad. All I am missing is the RS0ISS header which is the callsign used by the Russians on the space station.

I had a blast doing this. It was really fun and I hope NASA and Roscosmos would do more things like this in the future. It could really encourage people to join into the amateur radio community.

Update: QRZnow.com situation

Last week word got around that the website QRZnow.com (No relation to QRZ.com) was stealing content and bandwidth from other hams and making a profit from the work of others. They have been doing it for awhile but people finally had enough and started complain publicly in mass. There have been threads on Reddit.com’s amateur radio subreddit (forum) as well as activity on Twitter and G+.  Content creators who’s work was taken from them were speaking up. I even came out hiatus to make a post about this situation because my work was stolen as well.

I honestly thought it wasn’t going to end well. The staff over at QRZnow.com have not said a word and they we’re actively deleting evidence, comments and mentions of content theft on their websites and  social media streams. They even locked down their twitter account so @QRZnow mentions about content theft would not show up on their feed. I thought they were going to keep business as usual and steal content while denying everything.

They are not the only ones

I just want to make it known that QRZnow.com is not the only site stealing content from other amateur radio related websites for profit. There are many more but it seems that QRZnow.com was the most popular.

It appears QRZnow.com has changed their ways… For now. 

Even though the staff at QRZnow.com remains quiet about the situation, they have started to change their ways. Instead of stealing content word for word, stealing bandwidth and stealing images, they have captured and posted a low res screen shot and also posted a link to the source. That means the reader, if interested has to visit the source for more information. This a change in the right direction. There is still room for improvement on their end but it’s much better than stealing content. They still get advertising income and the source gets more traffic. It’s more a win-win for all.

However, due to the lack of communication from QRZnow, I am not sure if these are permanent changes. Who knows, after everything dies down, they might revert back to the way they used to do things. Even though it’s wrong, they might go back to what worked for them. They also might find some other ways to make a quick dollar from the hard work of other hams. I’m not sure what the future holds. I hope the staff at QRZnow.com have learned from this and can’t just take other people’s hard work and attempt to make profit.

It could be a good site

QRZnow.com could be a really good site. It could post interesting information and drive traffic to those site and create attention and awareness. It could be the place to go to see what other ham radio operators are doing. Due to the massive amounts of amateur radio related websites, we do need a website that brings attention to some of these websites, articles and projects.

They should take notes and learn from how hackaday.com does it. They’ve managed to become a very popular aggregate for the DIY electronic and maker. It drives a ton a traffic to websites, articles and projects that otherwise wouldn’t see much attention.

Hopefully everything works out and it benefits all who are involved. That’s all I hope for.

Thanks for reading,
NT1K


Content Thieves – Please Do Not Support Them!

(UPDATES SINCE 12/2/2014, PLEASE READ BOTTOM)

Let me start off by saying that I put hundreds of hours and a lot of money into my website. At this point in time, you don’t see advertisements on my website nor do I solicit money from my readers. This site was never created with the intentions of making any sort of profit. I wasn’t thinking about money. I just wanted a place to show all my adventures in amateur radio. Maybe someday I will come up with something that will change amateur radio for the better but I doubt that will ever happen. I think of NT1K.com as more of an online journal than anything. I’m glad people are reading.

Approximately one month ago I was browsing my  G+  account when I saw the 3D illustration of the 3 element tape measure yagi that I made. I was thinking, “Oh great, someone is sharing my website”.  Upon a closer look, I saw that it was a link to a different website, QRZnow.com (not to be confused with QRZ.com)

QRZnowNT1Kstolen

When I clicked on the link, I was amazed to see that my entire article including pictures and video were posted to the site. My entire article was taken word-for-word, grammar mistakes and all and posted on their site. They didn’t even bother to re-upload the images to their servers. They were stealing my bandwidth which I pay for. And to make it even worse, there was no mentions or links to my website other than my images that were marked with NT1K.com. This is strike three in my book.

I’ve seen my work on many other websites before and it never really bothered me because they were going about it  the right way for the most part. They didn’t steal my entire article and they placed a link citing the source. If the reader wanted more information, there was incentive to click on the link to the source to receive more information.  It’s sort of a win-win for both parties involved. Even though I don’t think it’s exactly fair, they get income and I get more visitors to my site. There are some well known news aggregator websites such as hackaday.com that give snippits of articles/projects with some input from the author. It gives the viewer the option to go to the source and check it out for themselves. It brings attention to the article/project while hackaday makes a little money. However QRZNow.com does not give the reader incentive to go to source website because they took the entire article and/or content. Why would someone click on the link to the source when they already have all the information from the source in front of their eyes.

At the bottom of every page on my website you will see the following image in two location

80x15

All my work listed on my page is licensed “Attribution-NonCommercial-NoDerivs” . That means I allow others to use my content as long as they give appropriate credit, can’t use it for commercial purposes and they can’t edit/transform the material and redistribute. QRZnow.com  has basically broke the license agreement by not giving appropriate credit and they’re using my article for commercial purposes by collecting revenue from advertisements.

Am I the original designer of the tape measure yagi? Nope. A lot (not all) of my articles are from projects that I’ve seen from others. I was interested in the project and documented my experiences with it and if possible, improve on either the design or how it’s presented with up-to-date parts lists and blueprints.

After looking into QRZnow, it became very clear that they are harvesting content by taking content/information from other websites, blogs and social media websites. It appears there is not one thing original in their content and it’s all copy and paste. Even though some articles on QRZnow have a links to the source, There is no incentive for their readers to go to source because QRZnow has completely copied the material giving no reason.

What’s Being Done About It?

I’ve attempted to e-mail the webmaster asking to have my article removed. All I received is a generic “Thank you” message. Nothing else. At that time I didn’t pursued it much further. I also mentioned  my issue on an online amateur radio chatroom where it caught the attention of some other hams that took more issue to it than I. After seeing more and more content being shared from QRZnow in the /r/amateurradio subreddit that I’m quite active in and help moderate, , a fellow moderator took it upon himself to make as many people know about what QRZnow.com  is doing. He did some research and gathered many examples and created a thread stating what QRZnow.com is doing. It caught the attention of some facebook users and a lot of those on twitter. Since then, other content creators came forward and claimed that QRZnow.com stole their material as well.

Instead of trying to remedy the situation, QRZnow.com decided to cover it up by deleting the articles on their site that were used as examples in the Reddit thread. They’ve also deleted any mention of content theft on their social media streams and even locked down their twitter account so any mentions of theft will not be displayed in their feed. Then they tried to attack the reddit thread by reporting it stating that it was “attacking my site with false accusations”.  Since this article was written, they are still taking content from others. I am assuming that they still doing it without permission. Even though it appears they are linking to the source, they are still taking the content in its entirety giving their readers no reason to visit the source.

It shows that they don’t care. That’s what bothers me. They have over 60,000 followers on facebook and is most likely making a good deal of money from advertising on their website. They are profiting from the hard work of fellow hams

I’m not calling for QRZnow,com to be shut down (yet). I just want them to change their ways. Give their readers some incentive to actually go to source so the person who actually did the work can benefit. That can be done easily by not re-posting entire articles. Give a portion of the article and then give a link to the source. If it was done  with a “Click-Through” type of platform, both QRZnow.com and the original author would benefit. They would get to advertise and the original author would get more attention. A part of me thinks they will never do that because it involves more work than CTRL-C and CTRL-V. I hope I’m proved wrong.

In most cases, I’ll support any site that is trying to help promote amateur radio. Even more so if the people behind it are not trying to make a profit from it. But if they are stealing the works of others and they are making a profit from it, I think they should not be supported.

Sorry for the rant but I felt this needed to be said.
NT1K

UPDATE  12/2/2014, PLEASE READ

At this point in time, We’ve heard nothing from the staff at QRZnow.com. However they’ve made changes on their website since this article and the threads on reddit were posted. They have stopped directly taking articles word for word. They now grab  low res screenshots of the source and give the reader much more incentive to visit the source. They have also unlocked their twitter account so it’s now public again.

Since we’ve not heard from QRZnow.com, I have no clue if these changes are going to be permanent or if they are going to revert back to what they’re used to doing after everything settles down. There are still rumors that they are taking and posting photos without permission or credit on Facebook and other social media sites they run. Due to the uncertainty of the future, I am leaving the above article up. QRZnow.com appears to be changing their ways but they are not the only site that is guilty of stealing content from other hams for the sake of profit.

Don’t get me wrong, I don’t “hate” QRZnow.com, I think it could be a really good source of information and a great way to promote other ham radio related websites as well as amateur radio in general. At the same time they get to collect money from their ads (there could be less ads). There is still a ton of room for improvement and hopefully they work at it as long as they don’t steal content and bandwidth from others.

So I am putting my pitchfork away… for now.


Field Day Weekend – Contact with the Space Station

It’s been a couple weeks since field day (FD) and I finally got around to writing something about my experience. For the past 4 years I’ve been doing field day with one of the local ham clubs. My first year I was a digital station and then for the past 3 years I’ve been the 40M SSB station in a 5 (or) 6A setup.  The HCRA puts on an impressive field day with 50′ portable towers, beams and wire antennas. It’s amazing to see a lot of the area hams come together and work for this one weekend. It’s something that I look forward to doing every year since before I was ever licensed.

In my first year running the 40M SSB station, I treated it like a contest even though it’s not really a contest. After looking back it, I treated some people very poorly because either they weren’t making contacts fast enough, calling long when there was a pileup and other things. Field day is meant to attract people to operating, not scare them away. So for the past couple of years, I made sure that other people got to operate with as little pressure as possible. It’s about having fun and not the rates of contact. The only time I would jump on the air is if there was no operators available and only then would I try to beat any personal goals.

This year was much better and felt that it was one of the best field days I’ve been a part of. Everyone seemed to leave happy and one potential ham had a great time racking up over 100 contacts. He went from being almost afraid and hesitant, to running on a frequency and holding his own.

The Icing on the cake however was making contact with the ISS. During field day Astronaut Gregory Weiseman (KF5LKT) was using the NA1SS callsign making contacts on 2M. The first pass of the ISS was approx 20M into field day. Kiley (K2KHA) managed to make contact with the ISS using the club call but we were informed that the contact didn’t count for as a SAT contact for field day so on the next pass we we’re going to line up and use our own callsigns. I lost track of time and was on the air when the next pass came. I looked up and saw people making contact so I jumped out of my seat and ran over.

Here I am making contact with the ISS.

(Credit to: Matt Williams, W2MDW)

You can see that I am still in field day mode and didn’t understand how Sat/ISS contacts are made but it still counts.  We all lined up to make contact before the pass was lost.

Great times!


My Mountain Topper Radio project

After doing some portable operations with the KX3, I felt that having something smaller and lighter would allow my pack to get smaller and smaller. The only problem is that there is nothing smaller than the KX3 that is comparable unless you get a CW only rig. I decided to get the MTR (Mountain Topper Radio) that was developed by Steve Weber (KD1JV). It’s a 2.5-5W QRP CW rig that gives you the options for two bands.

The problem is that the MTR kits are produced and sold in small quantities with high demand.  I’ve learned that Steve developed a version 2 of the MTR (3 bands) and had a pre-sale. Even though he gave out the wrong URL, people managed to figure out the correct URL and sold out within hours. I found out a tad too late and ended up having my money refunded.

I was a little bummed out. I was very excited that I might get this kit. I’ve never worked with surface mount devices and the CW only aspect of the rig would sort of force me to actually learn CW. After making my disappointment known, a local ham mentioned that he had an unbuilt kit from the orginal run that he might be willing to sell to me. Making fun of him didn’t help but I think the fact that I might learn CW might have compelled him to sell me his kit.

What did I just do?

Once I got my hands on the kit and took it home I inspected it (what ham doesn’t when they get a new toy?). That’s when I saw the components I’ll be dealing with. Very tiny resistors, capacitors and IC’s. The toroids were tiny and were not wounded.  Everything is so… small. I have built ham radio related kits before but they were all through hole meaning that the parts like the resistors and IC’s had legs and pins the fit into the holes. They were large enough to where I can easily work with them.

I am not prepared for surface mount work. My soldering iron is this $10 Radio Shack 35W fixed iron. I knew it was not ideal for SMT as I have tried and failed using that iron. I need to learn how to solder surface mount and I need the proper gear to do it with. I’ve learned over the years that working with the correct tools makes the job much easier.

New Tools In The Shack

I’ve learned the hard way many times over that having the proper tools can make things a lot easier. I feel that I have everything needed for the job except for a soldering iron. I looking at the sub $40 Chinese type irons but I stopped myself from purchasing one. I wanted an iron that can last me for many years so I ended up purchasing a Hakko 888D soldering iron. At around $100 I felt that it was worth the purchase.

The Build. Day One!

Soon as I got the iron in, I went straight to work. Following the assembly guide I started with the IC’s and the MCU. I felt that you are starting with the hardest part of the job by soldering small SMT IC chips with small leads and small gaps. I avoided installing the MCU and DDS chips until the other ICs were installed.  Once all the IC’s were installed, I used a jewelers loop and checked my connections. The MCU was crooked a bit and thought it was still good so I kept chugging along. I installed the resistors on the bottom of the board and called it a night.

20140506_215401

My working area. You’ll see the board with solder, tweezers, assembly manual, solder, 10X  Jewelers loop, desk lamp with magnifying glass and my new soldering iron. When I purchased the soldering iron, I also purchased different sized and shaped tips.

The Build. Day Two

Next day I got back from work and installed everything else.  It wasn’t really bad as I thought. The soldering Iron was tight in some places but it appeared everything went quite well.

smttsd

Here is a close up of my soldering. It could be better but I would say not too bad considering I’ve never done SMT work before.

Power On Time.

I didn’t want to wire up the power, headphones or anything else because I was going to design a case but in order to make sure it worked. I needed to wire it up.  Soon as I hooked up the battery… Nothing!  It did’t lite up, It didn’t beep. The only thing I notice was a slight noise in the headphones. Sounded like the noise of when you turn something on.

What Went Wrong?

As panic starts to set in, I was worried that I now have a nice new expensive brick  on my hands. All that time, energy and money spent on the kit and tools needed seemed be wasted. Out came the jewelers loop and soldering iron. I double checked every connection. Then I took out the multimeter and followed the troubleshooting guide in the manual and started checking voltages coming out of the regulators. Everything was checking out. The only thing I see is that the MCU was a little bit crooked.

I tried re-soldering the MCU but it proved to be very difficult. I used solder wick and suction tools that did not help, the chip would not move for me. For me the only choice was to remove the MCU. But how? After some internet searching I decided to use enameled wire and snake it under the chip where the leads meet the chip. I then touched the soldering iron to the leads and slowly pulled the chip off.

eIpMXvS

Using that method allowed to me to remove the chip, but in the process I damaged the MCU. The above images is not representative of my soldering work. It was more of a panic move and I just wanted to get the chip off without damaging the pads or board. The pads were in great shape and I’m just lucky nothing else happened.

Dealing With Steve Weber

Well it’s obvious the chip will need to be replaced. There are two options available. Beg steve for a new chip or purchase the MCU and flash it using a MSP Launchpad. I almost went the latter because Steve just released V2 and I am sure he was busy dealing with that and life in general but I decided to e-mail him anyways.

Dealing with Steve was a pleasure. I know these radios is not his full time job but he replied within a reasonable time and he was willing to send out a pre-programmed chip for my version of the MTR. Since I was having him sending me stuff, I purchased a case because the price he was asking was more than fair.

Attempt #2

Now that I have the new MCU, I promptly installed it. This time I quadruple check to make sure the chip was aligned properly before soldering. It went much better.

9xY2xy6

When I applied power I jumped for Joy as I saw the LED come to life and the sounds of CW in my headphone. I did some initial testing and then installed the last toroid.

It’s… ALIVE!!! ALIVE!!!  

Now that it turns on, it’s time to make the adjustments needed for proper operation. Thankfully I have Acquired the test gear I needed over the years from mostly local hams looking to clean their shack. I have a decent frequency counter, oscilloscope and a station monitor.

The manual found on the Yahoo Groups page provided step by step installation and tuning. It made things a lot easier.

20140525_093919

First thing I did was adjusted the reference oscillator frequency to match exactly 10MHz. This was very easy. Just pushing a button until I see 10Mhz on the counter. There are reference points on the board to where you can easily measure things.

20140525_094159

Adjusting the LO to find the center of the passband. This was a little tricky because I didn’t fully understand the manual and process. In the tuning mode the MCU sends out a tone and I adjusted it by watching the signal peaking on my scope while counting the steps between the peaks. I then went backwards only half of the steps. Hopefully it was done correctly. For me, this was the hardest part of tuning.

20140525_095042

Here I am adjusting the receivers filters. With the station monitor I injected a signal into the MTR through the antenna port and adjust the band capacitors until the signal was at it’s loudest. I did the same thing on the other band. This was quite easy.

Last thing I did was hooked it up to a dummy load and checked for output wattage. Using a variable power supply and a DMM hooked in-line, I’ve sent out a tuning signal and adjusted the power supply until the DMM read 9Vdc with a TX load. I was seeing approx 2.5W which is within spec.

Time to get one the air

Now that it’s built and tested, It’s time to get on the air and see what I can (not) do.

20140525_100322

Heh, it’s smaller than my paddle.  What’s great about CW is that you don’t have to call CQ over and over again hoping someone would come back to give you a signal report. Just call CQ a couple times and head over to the Reverse Beacon Network where you can see almost in real time where your signal is being heard. There are receivers all over the world scanning the bands for signals.

TdHhvUi

Here are my results using just a crappy 9V battery. I am pleased to see that not only are stations hearing my signal, but they are on the frequencies that the MTR is tuned to. While I was testing the worst thing happened… Someone replied. I tried very much to work the person. I know the call was a K2 something but that’s all I could make out.

Final Thoughts

This was my first actual kit that I built, It’s also the first time that I ever worked with tiny surface mount devices and even though I messed up the MCU, it was really fun to build. Soldering SMD seems to be a nightmare but after the first couple of parts, it felt real easy and it felt that I was working much quicker compared to through hole parts. This project is also a big kick in the ass to learn CW because I want to use this rig. I’m all about packing very lite when it comes to SOTA and even though I love the KX3, I feel it would be more of an adventure using the MTR. We’ll see.

Thanks for reading!

– Jeff


SOTA Activation Report – Peaked Moutain (W1/CR-006)

I had some time to myself on Saturday (6/14) which is rare so I decided to play a little radio on top of a mountain/hill. I found that when it comes to doing SOTA that ends up being a last minute effort to get my stuff ready. This time I wanted to do a summit that I have never done before. I decided to go to Peaked Mountain located in Hampden/Monson MA.  I notified SOTAwatch and local SOTA/Ham facebook groups that I will be out. I find that letting many people know that you’re going to be activating will increase your chances of a successful activation.

The Hike

Expecting the unknown for both the hike and summit I over packed which is better than not packing that one item you’ll end up needing. The mountain is closer to my QTH then I originally thought which was great. The hike also wasn’t bad. The trails were (now) clearly marked and was able to make it to the summit in 20min or so. My only concern was the rain.

20140614_112340

Welded Sign/Box near the summit

The Setup

Due to the overcast I didn’t have much time to really enjoy the view. I wanted to get on the air as fast as possible in case it was going to rain. However I have a new G5RV jr that I home brewed to replace the crappy G5RV that I was using. I also took along the  vertical end fed (EARCHI) as I’ve never used it for SOTA. I wanted to put both up.

20140614_125343

Here you can see the G5RV mounted to the Jack Kite 31′ fiberglass pole. I used an eyebolt that is connected to the center insulator and slid it down the mast. I might place some tape at that spot to keep the eyebolt from wearing out the fiberglass tube. Also pictured is the end fed that is attached to the tip of the pole.

20140614_125346

Another photo showing my mini G5RV. I made custom insulators using plexiglass that doubles as winders

20140308_121257

Here is a photo showing my old G5RV next to my new one.

20140614_124641

Here is a shot of the antenna with both antennas attached.
Setup took less than 10Min with most of my time spent untangling wires.

Getting On The Air

After sending out a spot to SOTAwatch and my local SOTA group I was on the air. However no one is coming back. Usually I get people within minutes coming back to my crys of CQ. After about 10min or so, Jim (KK1W) came back to my crys and made my first contact. Other people started to trickle in.  After AJ5C and N4LA I heard a couple DX contacts from Romania and England but was un-able to establish contact

20140614_124632

My setup with the KX3, Wouxun for VHF and my 9:1 match for the endfed

I tried switching around bands and antennas to make my contacts. I knew I could make contact with KB1RJC and KB1RJD if I went onto 40M and sure enough they were on and waiting (thank you). They made my 4th and 5th contact.

20140614_124623
My Seat with Antenna in the background

After making a couple more local contacts, I called it a day. I have 7 contacts so I can consider the summit to be officially activated. The sun started to come out and the skys started to clear up a bit and was able to enjoy the view from the mountain top

20140614_124651

20140614_124655

Views from the top of Peaked Mountain.

Overall Experiences 

20140614_124610

I’d say this was the hardest HF activation I’ve done to date. It was not the hike because that was very nice and easy. It was hard because I am not sure if it was my antennas, location, band conditions or a combination of all three that was making it difficult for communicating. There were also many hikers up on the mountain and I ended having to explain “what that is” many times over which took me away from the radio. Even though I love explaining what my setup is to non-hams, I just wasn’t in the mood but I didn’t want to come off as rude. I love the location and mountain and this location is now on my list of summits to activate next year.

Thanks for reading,

Jeff – NT1K